Setting up a Fresh DaDesktop Server
Deploying DD Node on GTHost / Hetzner Servers
The following notes are designed to support the deployment of a DaDesktop Node on bare metal Linux servers, such as those provided by GTHost or Hetzner. Keep in mind that these instructions may evolve alongside the installation and deployment scripts.
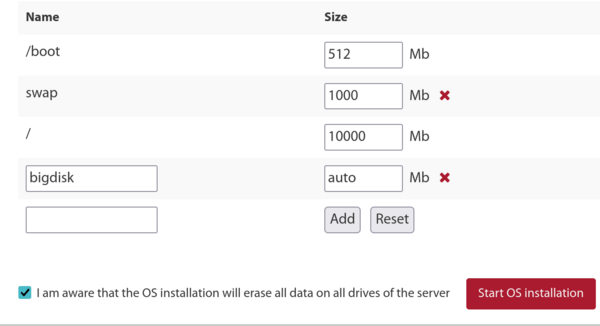
We'll assume you have already purchased a server and will set it up with Ubuntu Jammy 22.04. Note that leveraging RAID0 (striping) can accelerate disk access if you have ample space across two or more disks. With Hetzner, this configuration is set via the 'installimage' process while in Rescue mode.
Preparing and Installing the OS on GTHost / Hetzner
-
Start by SSHing in with the provided root credentials. Run
apt updateandapt upgradeto bring all packages current. Then, executeapt autoremoveto clear out any obsolete packages before upgrading further. - On a Hetzner instance, you'll initially boot into rescue mode. There, define the distribution requirements, software RAID (mdm), XFS, IPv4 settings, etc., prior to rebooting and upgrading. Usually, it's fine to stick with defaults for the small /boot and /boot/esp partitions using ext4 (not XFS) and skip creating a swap partition as it's unnecessary. Allocate the / partition to XFS and let it consume the remaining disk space.
- For LeaseWeb or other providers, you'll need to convert the main / filesystem to XFS instead of ext4 or btrfs. The guidance below offers a rough approach, but ensuring the / partition uses XFS is trickier than simply designating /bigdisk as XFS, because any filesystem modifications must be performed outside the OS—changing the / filesystem type while it is mounted is neither straightforward nor safe.
-
To create an XFS filesystem, use your provider's utility if available, as it's much simpler. Otherwise, from a rescue environment you might run something like:
mkfs.xfs -f /dev/mdx(which formats as XFS; the -f flag forces the overwrite).
Note: we no longer set up /bigdisk as a separate partition; it's now just a directory under /. -
Mount the XFS filesystem outside the OS with
mount -t xfs /dev/mdX /, or use the system portal to accomplish this. -
If you're using a separate /bigdisk partition (which is now uncommon), add
defaults,nofail 0 0to /etc/fstab so the system can boot even if that partition fails to mount. -
Run
systemctl daemon-reloadso systemd picks up changes to /etc/fstab. -
Execute
mount -ato verify all partitions are created correctly, and confirm withdf -T. -
Reboot
Executing the DaDesktop Installation Script
-
SSH into the server, e.g.,
svr@xxxxxxxxx. - Proceed with installation using the DaDesktop script:
- curl http://npg.io/d > d
- At this stage, you'll want to upgrade the base OS from 22.04 to the latest Ubuntu release—currently 23.10 Mantic, soon to be 24.04 Noble.
-
The most efficient way is to use the
update-osscript located in/apps/dadesktop_npnode_deploy/modules/00-upgrade-os. This script automates the process, avoiding manual dist upgrades and updating the apt sources from jammy to mantic (nautic) in a single step. Although upgrading across two releases at once is generally not recommended, the very limited number of installed packages makes it quite safe. -
If DNS stops working during the distribution upgrade (which we encountered once), resolve it with:
rm /etc/resolv.conf ; echo "nameserver 8.8.8.8" > /etc/resolv.conf -
Optionally, set a hostname, for example
lo33uk.npg.io, if you want a custom DD node name—perhaps to reuse a previously configured name. Reboot if necessary to apply the hostname change. -
Then, run the main installation script for the DD Node. To guard against a broken SSH connection during the upgrade, consider using
tmux. Navigate to the directory where the script was downloaded and executebash d. - Monitor the on-screen log output for any errors. The script will automatically add the server's IP to the NP access list; however, you may need to wait a minute or two for the whitelist cron job to update before you can proceed.
- Review the script's progress and address or report any issues that arise.
-
Run the cleanup script at
/apps/dadesktop_npnode_deploy/modules/00-cleanup, which removes many unnecessary packages and downgrades others. -
Execute
/apps/zabbix-agent/services/test-all.shto check for any remaining problems. -
For any unmaintained packages, remove them with
apt purge xxx yyy, and delete any broken links that appear. -
Finally, reboot and verify everything works.
Verifying the DD Node After Installation
- In the DaDesktop GUI, locate the new DD server entry and test it using TPAPI or similar.
- Set the start and expiry dates for the server within DaDesktop, and assign it to a datacenter if needed.
- Monitor the new server's operation in Zabbix and resolve any alerts or issues.
- Perform a test by adding a Standalone instance to the server and running it.
- If necessary, add the server to the appropriate datacenter.
- Optionally, configure billing rules for the server.
- Copy OS templates to the server as required.
- When this server is intended for a specific course, inform the trainer or coordinator to utilise it.
Enjoy!